Friday 31 May 2013

Image Icon Converter v.1.3 ကုိ crack လုပ္ၾကရေအာင္

မဂၤလာပါ။ Tech in Blogging မွႀကိဳဆိုပါတယ္။ ဒီတစ္ခါေတာ့ ပံုကေန icon ကိုေျပာင္းတဲ့ software ကို full version ျဖစ္ေအာင္ crack နည္းေလးပါ။ လိုလို္မယ္မယ္ crack file ကိုယူထားလိုက္ပါ။

Wednesday 29 May 2013

ဘေလာ့ပိုစ့္မ်ားရဲ႕ ေအာက္မွာ Page Number ေတြထားမယ္

မဂၤလာပါ။ Tech in Blogging မွႀကိဳဆိုပါတယ္။ခု တတိယသမီးေတာ္ကိုေတာင္းပန္ပါတယ္။ သူေမးတဲ့ ေမးခြန္းက တစ္ဖက္လူ နားေပါက္ေအာင္ေမးသင့္ပါတယ္။ ဆိုဒ္ရဲ႕ေအာက္ဆံုးမွာ မေန႕က ကြ်န္ေတာ္ရွင္းျပခဲ့တဲ့ ေကာ္လန္ပဲရွိပါတယ္။ ေတာ္ေတာ္စိတ္ပ်က္သြားပါၿပီ။


ကဲကဲ။ ဒီတစ္ခါေတာ့ နည္းလမ္းေပးခဲ့ပါမယ္။ ပိုလြယ္ပါတယ္။ မရရင္ေတာ့ cbox လာမေအာ္ခဲ့ပါနဲ႕။ သင့္ template က ျပန္ျပင္ဖို႕လိုတယ္ဆုိတာပဲမွတ္လိုက္ပါ။
  • Select style မွာႀကိဳက္တာေရြးပါ။
  • Number of posts per page: မွာ သင့္ ဘေလာ့မွာရွိတဲ့ ပိုစ့္အေရအတြက္ိုအရင္ရွာၿပီးမွထည့္ပါ။ ကြ်န္ေတာ္ဆုိရင္  7 ကိုသံုးထားပါတယ္။
  • Page Num Count before and after current page: မွာ ႀကိဳက္သေလာက္ထည့္ႏုိင္ပါတယ္။ 
  • Generate ကိုကလစ္ပါ။
  • Add to Blogger ကိုကလစ္ပါ။ အဆင္ေျပပါၿပီ။


ဒီေလာက္ဆုိရင္ အားလံုးနားလည္ၾကၿပီထင္ပါတယ္။ ဒီထက္လြယ္တာမရွိေတာ့ပါဘူး။ ဟုတ္တယ္ဟုတ္။ ;)


I am YGNBlogger and the founder of Tech in Blogging. I am 9th grade student. I'm now 15 years old. I like blogging and writing posts. Through these, my hobbies are swimming and playing games. I am also interested in driving cars.

Hide IP Easy 5.1.6.6 ကို crack လုပ္ရေအာင္

မဂၤလာပါ။ Tech in Blogging မွႀကိဳဆိုပါတယ္။ ဒီတစ္ခါေတာ့ hacker လက္စြဲ software တစ္ခုပါ။ trial version ကို full version အျဖစ္ေျပာင္းေပးထားပါတယ္။ crack ထည့္နည္းေကာ ၊ crack file ပါေပးထားပါတယ္။ ဆက္ဖတ္ပါ။


  • HideIPEasy.exe ကို C:\Program Files\HideIPEasy\HideIPEasy.exe မွာထည့္လိုက္ပါ။ HideIPEasy.exe ကိုခဏပိတ္ထားပါ(32bit ကိုင္သူမ်ားအတြက္)
  • HideIPEasy.exe ကို C:\Program Files (x86)\HideIPEasy\HideIPEasy.exe မွာထည့္ပါ။ HideIPEasy.exe ကိုခဏပိတ္ထားပါ(32bit ကိုင္သူမ်ားအတြက္)
  • ၿပီးရင္ box တစ္ခုက်လာလိမ့္မယ္။ Windows 7 မွာ Copy and Replace လုပ္ပါ။ Windows XP မွာ Yes to all ေပါ့ဗ်ာ။
  • အဆင္ေျပပါၿပီ။

တျခား cracks မ်ားလည္းရွိေသးတယ္ဗ်ာ ... ေအာက္က ႏွစ္သက္ရာကိုယူႏိုင္ပါတယ္ -
Smadav 2013 Rev.9.3
WinRAR 5 (Beta 4)
Adobe Photoshop CS3(Software crack)
Adobe Dreamweaver CS5
Adobe Photoshop CS3 (Serial fix)
WinZip 17.5
Zip Password Tool 2.3
ပိုၿပီး လိုခ်င္ရင္ေတာ့ http://techinblogging.blogspot.com/search/label/Cracks မွာရယူႏိုင္ပါတယ္။ အဆင္ေျပပါေစ။


I am YGNBlogger and the founder of Tech in Blogging. I am 9th grade student. I'm now 15 years old. I like blogging and writing posts. Through these, my hobbies are swimming and playing games. I am also interested in driving cars.

Tuesday 28 May 2013

သင့္ Blogger site ရဲ႕ေအာက္မွာ ေကာ္လန္ ၃ခုျခားနည္း (Blogger only)

မဂၤလာပါ။ Tech in Blogging မွႀကိဳဆိုပါတယ္။ ခုလိုမ်ိဳး Blogger tips မေရးတာၾကာပါၿပီ။ တတိယသမီးေတာ္ရဲ႕ ယခုေမးထားတဲ့ ေမးခြန္းေလးက လြယ္ပါတယ္။ ခုအေျဖေပးလိုက္မယ္ဗ်ာ။ လံုး၀မခက္ပါဘူး။ custom template သံုးတဲ့သူေတြအတြက္ပါ။

တတိယေျမာက္သမီးေတာ္: ဆိုဒ္ေအာက္ဆံုးမွာ စာမ်က္ႏွာေလးေတြ ထဲ့ထားတာေတြ ့တယ္ အဲ့ဒါ ဘယ္လိုလုပ္ရတယ္ ဆိုတာေလး ေျပာေပးပါလားရွင္


page မဟုတ္ပါဘူး။ columns (ေခၚ) ေကာ္လန္ ေလးေတြပါ။ ေအာက္မွာေတာ့ ထည့္နည္းေလးေတြလာပါၿပီ။ ဆက္ဖတ္ပါ။
ေအာက္က html code ကို </body> ရဲ႕အေပၚမွာထည့္ရေအာင္...

<div id='footer-column'>
<div class='footer'>
 <b:section class='footerA' id='footerA' showaddelement='yes'/></div>
<div class='footer'>
 <b:section class='footerB' id='footerB' showaddelement='yes'/></div>
<div class='footer'>
 <b:section class='footerC' id='footerC' showaddelement='yes'/></div>
</div>
ဘာဆက္လုပ္ရမလဲဆုိတာကိုသိခ်င္ရင္ ဆက္ဖတ္ၾကည့္ပါ။
ေအာက္ကအတုိင္းကူးၿပီး ]]></b:skin> ရဲ႕အေပၚတြင္ထည့္လုိက္ပါ။ ကြ်န္ေတာ္ ဘာလို႕ဒီကုဒ္ေတြထဲမွာအေရာင္ထားတာကို ေနာက္မွရွင္းျပပါမယ္ဗ်ာ။
#footer-column{width:948px;margin:10px auto;padding:10px 6px;overflow:hidden;background:#333;color:#fff;}
.footer{width:306px;margin:0px 5px;padding:0px;overflow:hidden;float:left;}
.footer h2{font-weight:bold;margin:5px;padding:5px 0px;border-bottom:2px dashed #ff0000;color:#fff;}
.footer a{text-decoration:none;font-weight:bold;color:#00fff0;}
.footer a:hover{color:#fff;}

ဆက္ၾကည့္ပါ။

ကူးၿပီးရင္ သင့္ရဲ႕ Layout ပံုစံက ကြ်န္ေတာ့္ဆိုဒ္ကပံုစံနဲ႕တူပါၿပီ။ ေအာက္ပါပံုကိုၾကည့္ပါ။ Layout ကိုသြားလိုလွ်င္ ကြ်န္ေတာ္ေပးတဲ့အတိုင္းသြားပါ။ :D

Blogger >> Layout

ဒီလိုမျမင္ရင္ေတာ့..ျပန္စပါ။ ဟီး။ အဲ့ဒါက ေအာက္မွာရွိပါတယ္။ ကဲ။ သူ႕ရဲ႕ပံုစံ ေတြပါၾကည့္ရေအာင္...


ဒါကိုျပင္ဖို႕ နည္းပါေပးလိုက္မယ္... ဒီအေရာင္က အနက္ေရာင္ template မွာပဲလိုက္ဖက္ပါတယ္။ ျပင္ခ်င္တဲ့သူေတြအတြက္ ေဆးညႊန္းပါေပးလိုက္မယ္။
Photoshop မွာမစမ္းပါနဲ႕။ အေရာင္အမွန္အကန္မရလာတာကို ကြ်န္ေတာ္သတိထားမိပါတယ္။ ဒါေၾကာင့္ Hex Color Generator ေလးကို ဒီကိုကလစ္ ျခင္းျဖင့္ သံုးရေအာင္ဗ်ာ။

  • footer-column မွာ 960 px ပါ။ ေကာ္လန္မွာ ၃ခုပါၿပီး ေနာက္ခံ(background အေရာင္) မွာ #333 ျဖစ္ပါတယ္။ အခဲေရာင္လိုလို အနက္ေရာင္လိုလိုပါ။ သင္ႏွစ္သက္သလိုေျပာင္းလုိ႕ရပါတယ္။
  • .footer h2 မွာေတာ့ စာအေရာင္က အျဖဴေရာင္ပါ။ #fff ပါ။ မႀကိဳက္ရင္ ေျပာင္းလို႕ရပါတယ္။ ေဘာင္အစက္စက္နဲ႕အေရာင္က အနီေရာင္ပါ။ #ff0000 ပါ။ ေျပာင္းခ်င္ရင္ ေျပာင္းလုိ႕ရပါတယ္။ ျဖစ္ႏိုင္ရင္ ေဘာင္ကိုပါဖ်က္လို႕ရပါတယ္။
  • .footer a ကလင့္ပါ။ #00fff0 အေရာင္အမ်ိဳးအစားပါ။ ေျပာင္းလို႕ရပါတယ္။ font-weight:bold မွာ font-weight:italic လို႕လညး္ေျပာင္းလို႕ရပါတယ္။
  • .footer a:hover ကလင့္ကိုေထာက္လုိက္ရင္ ေျပာင္းတဲ့အေရာင္တစ္ခုပါ။ နဂိုက #fff ပါ။ မႀကိဳက္ရင္ေျပာင္းလိုက္ပါ။

ရွုပ္သြားမယ္ဆုိတာကိုေတာ့သိပါတယ္။ ရွုပ္မယ္ဆုိရင္ ဒီအဆင့္မတိုင္မီရပ္ဖို႕မွာထားခ်င္ပါတယ္။ သူငယ္ခ်င္းတို႕... သတိနဲ႕သာလုပ္ၾကေတာ့ဗ်ာ။ ကြ်န္ေတာ္ နားလည္သေလာက္..တတ္သေလာက္ရွင္းျပထားပါတယ္။ အားလံုးနားလည္မယ္လုိ႕လည္း ေမွ်ာ္လင့္ထားပါတယ္။ အဆင္ေျပပါေစ။


I am YGNBlogger and the founder of Tech in Blogging. I am 9th grade student. I'm now 15 years old. I like blogging and writing posts. Through these, my hobbies are swimming and playing games. I am also interested in driving cars.

Sunday 26 May 2013

Recycler ဗိုင္းရစ္ေတြကိုရွင္းမယ္

မဂၤလာပါ။ Tech in Blogging မွႀကိဳဆိုပါတယ္။ ဒီတစ္ခါေတာ့ ကြ်န္ေတာ္တို႕ကိုယ္တုိင္ဖန္တီးထားတဲ့ ဗိုင္းရစ္ ရွင္းတဲ့ေဆာ့၀္လ္ေလးကိုသံုးၾကည့္ပါ။ 1.0 ပဲျဖစ္ပါတယ္။ ကြ်န္ေတာ္တုိ႕ ေနာက္ထပ္ေကာင္းမယ့္ ေဆာ့၀္လ္မ်ားဖန္တီးေပးဦးမွာပါ။ Virus, PC Optimizer စသျဖင့္ အသံုး၀င္၀င္မ၀င္၀င္ ဖန္တီးေပးဦးမွာပါ။ သင္မယံုရင္မသံုးပါနဲ႕။ Virus မဟုတ္ဘူးလို႕ ကြ်န္ေတာ္အာမခံပါတယ္။


  • Recycle Virus Killer V1.0.exe ကိုဖြင့္ပါ။
  • ၁မိနစ္ - ၂မိနစ္ေလာက္ပဲၾကာမယ္။
  • ဘာမွမေၾကာက္ပါနဲ႕။ virus ရွိရင္သတ္ေနတာပါ။ မရွိရင္ ဘာမွမျဖစ္ပါဘူး။ စာတန္းေတြရပ္သြားၿပီးတာနဲ႕ပိတ္လို႕ရပါၿပီ။

တျခား Applications မ်ားလည္းရွာေဖြႏိုင္ပါတယ္။ ေအာက္ပါအတုိင္းသင္လိုရာယူလိုက္ပါ။
Viber 1.041 for Nokia
Blogger for Mobile
Tech in Blogging @ Android
ပိုၿပီးလိုခ်င္ရင္ ဒီကိုႏွိပ္ၿပီး ရယူႏုိင္ပါတယ္။ အဆင္ေျပပါေစ။


I am YGNBlogger and the founder of Tech in Blogging. I am 9th grade student. I'm now 15 years old. I like blogging and writing posts. Through these, my hobbies are swimming and playing games. I am also interested in driving cars.

Saturday 25 May 2013

Zip Password Tool 2.3 ကို crack လုပ္မယ္

မဂၤလာပါ။ Tech in Blogging မွႀကိဳဆိုပါတယ္။ ခုေနာက္ဆံုးေပၚျဖစ္ေနတဲ့ Zip Password Tool 2.3 ကို full version အျဖစ္ crack လုပ္မယ္ဗ်ာ။ ထံုးစံအတုိင္းဆုိရင္ အျပည့္ မရပါဘူး မ၀ယ္ရင္။ Zip Password Tool ဟာ zip ဖိုင္မွာရွိတဲ့ password ကိုရွာေဖြေပးတာပါ။ သူမ်ား crack ထားတာေလးကို ျပန္ share ေပးထားတာပါ။ 32 bit ေကာ 64 bit အတြက္ထည့္ေပးထားပါတယ္။


  • ZipPasswordTool.exe ကို C:\Program Files\FDRLab\Zip Password Tool မွာထည့္လိုက္ပါ။ ZipPasswordTool.exe ကိုခဏပိတ္ထားပါ(32bit ကိုင္သူမ်ားအတြက္)
  • ZipPasswordTool.exe ကို C:\Program Files (x86)\FDRLab\Zip Password Tool မွာထည့္ပါ။ ZipPasswordTool.exe ကိုခဏပိတ္ထားပါ(32bit ကိုင္သူမ်ားအတြက္)
  • ၿပီးရင္ box တစ္ခုက်လာလိမ့္မယ္။ Windows 7 မွာ Copy and Replace လုပ္ပါ။ Windows XP မွာ Yes to all ေပါ့ဗ်ာ။
  • အဆင္ေျပပါၿပီ။


တျခား cracks မ်ားလည္းရွိေသးတယ္ဗ်ာ ... ေအာက္က ႏွစ္သက္ရာကိုယူႏိုင္ပါတယ္ -
Smadav 2013 Rev.9.3
WinRAR 5 (Beta 4)
Adobe Photoshop CS3(Software crack)
Adobe Dreamweaver CS5
Adobe Photoshop CS3 (Serial fix)
WinZip 17.5
ပိုၿပီး လိုခ်င္ရင္ေတာ့ http://techinblogging.blogspot.com/search/label/Cracks မွာရယူႏိုင္ပါတယ္။ အဆင္ေျပပါေစ။


I am YGNBlogger and the founder of Tech in Blogging. I am 9th grade student. I'm now 15 years old. I like blogging and writing posts. Through these, my hobbies are swimming and playing games. I am also interested in driving cars.

Thursday 23 May 2013

Winzip 17 ႏွင့္ပတ္သတ္ေသာ versionမ်ား ကို full version ျဖစ္ေအာင္ Crack လုပ္မယ္

မဂၤလာပါ။ Tech in Blogging မွႀကိဳဆိုပါတယ္။ ခု crack ေရးတာ အမ်ားသံုးေစလြယ္ဖို႕ပါ။ ဒီမွာ ေတာ့ တစ္မ်ိဳးေ၀ဖန္ခဲ့ပါတယ္။ အမွန္ေတာ့ အဲ့လိုမဟုတ္ပါဘူး။ ခု Winzip 17.1 ကေန ေနာက္ဆံုးထြက္ေနတဲ့ 17.5 အထိေပါ့။ 32-bit အတြက္ပဲရမယ္ဗ်ာ။ ဟက္တာမဟုတ္ပါဘူး။ crack တာပါ။ :D Hacking အပိုင္းကိုဖတ္ခ်င္ရင္ http://techinblogging.blogspot.com/search/label/Hacking မွာဖတ္ပါ။


  • Winzip_17xx_Crack_TechInBlogging.blogspot.com.rar ကို Extract လုပ္ပါ။
  • Winzip 17xx.reg ကိုဖြင့္လိုက္ပါ။ Box ေပၚလာလွ်င္ Yes ကိုကလစ္ပါ။
  • ဒါဆုိရင္အဆင္ေျပပါၿပီ။


တျခား cracks မ်ားလည္းရွိေသးတယ္ဗ်ာ ... ေအာက္က ႏွစ္သက္ရာကိုယူႏိုင္ပါတယ္ -
Smadav 2013 Rev.9.3
WinRAR 5 (Beta 4)
Adobe Photoshop CS3(Software crack)
Adobe Dreamweaver CS5
Adobe Photoshop CS3 (Serial fix)

ပိုၿပီး လိုခ်င္ရင္ေတာ့ http://techinblogging.blogspot.com/search/label/Cracks မွာရယူႏိုင္ပါတယ္။ အဆင္ေျပပါေစ။


I am YGNBlogger and the founder of Tech in Blogging. I am 9th grade student. I'm now 15 years old. I like blogging and writing posts. Through these, my hobbies are swimming and playing games. I am also interested in driving cars.

WinRAR 5(Beta 4) ကို Full verison ျဖစ္ေအာင္ Crack မယ္

မဂၤလာပါ Tech in Blogging မွႀကိဳဆိုပါတယ္။ ခု WinRAR ေနာက္ဆံုးထြက္ေပၚေနတဲ့ 5 (Beta 4) ကို share ပါဦးမယ္။ Windows 32 bit အတြက္ပါ။ 86 အတြက္မရေသးပါဘူး။ :) ခုလက္ရွိကြ်န္ေတာ့္ဆရာေတြေၾကာင့္ ကြ်န္ေတာ္ crack တစ္ခုကိုေရးသားႏုိင္ခဲ့ပါတယ္။ အဲ့ဒီ WinRAR ကိုလိုခ်င္ရင္ ဒီမွာ ယူပါ။ crack တာေတာ့နည္းပါေျပာခဲ့မယ္ဗ်ာ။


ေအာက္ကပံုကိုအေျခခံမယ္ဆုိရင္ ရက္၄၀ေက်ာ္ရင္ အဲ့လုိေပၚလာပါတယ္။ အရမ္းအေႏွာင့္အယွက္ေပးပါတယ္လုိ႕ ကြ်န္ေတာ္ထင္ပါတယ္။ ဒါေၾကာင့္ ကြ်န္ေတာ္ကုိယ္ Crack တစ္ခုေရးသားလိုက္ပါတယ္။


ကဲ.. ထည့္နည္းေလးေျပာျပမယ္ဗ်ာ။ Crack ကိုေလာေလာဆယ္ အရင္ယူလုိက္ဦး။ ဖိုင္ဆုိက္ ကနည္းနည္းေလးပါ။


  • WinRAR.exe ကို C:\Program Files\WinRAR မွာထည့္လိုက္ပါ။ WinRAR ကိုခဏပိတ္ထားပါ။
  • ၿပီးရင္ box တစ္ခုက်လာလိမ့္မယ္။ Windows 7 မွာ Copy and Replace လုပ္ပါ။ Windows XP မွာ Yes to all ေပါ့ဗ်ာ။
  • ဒါၿပီးရင္ သင္ rar ဖိုင္ေတြကိုဖြင့္ၾကည့္ပါ။ အဲ့ဒီ ရွုပ္ရွွပ္ႀကီးမတက္လာေတာ့ပါဘူး။

Greet to >> Ben Yaung , G0dK!nG_92

အဆင္မေျပဘူးဆုိရင္ ေအာက္ပါ Comment box တြင္ ေပးပါ။ လိုအပ္လွ်င္ ppt1459@gmail.com ကိုအပ္ၿပီးေမးျမန္းႏိုင္ပါတယ္။


I am YGNBlogger and the founder of Tech in Blogging. I am 9th grade student. I'm now 15 years old. I like blogging and writing posts. Through these, my hobbies are swimming and playing games. I am also interested in driving cars.

Monday 20 May 2013

Smadav 2013 Rev.9.3 ကို Crack လုပ္မယ္

မဂၤလာပါ။ Tech in Blogging မွႀကိဳဆိုလ်က္ပါ။ ခု ျမန္မာအိုင္တီၿမိဳ႕ေတာ္ မွ share လိုက္တဲ့ ပိုစ့္ေလးတစ္ခုပါ။ Keygen ထည့္တဲ့အခါ ရြာလည္ေနသူေတြအတြက္ crack ေပးလိုက္ပါတယ္။ ခုေလာေလာဆယ္ေတာ့ အဲ့ဒါ ေနာက္ဆံုး Version ပါ။ အားလံုးအတြက္လြယ္ကူေအာင္ share လိုက္ပါတယ္။ Pro ေဆာ့၀္လ္ျဖစ္ေအာင္လုပ္ရတာမခက္ပါဘူး။ အဲ့ဒါ crack ၿပီးရင္ Number of PC's: 999 လိုျဖစ္ၿပီးျဖစ္ပါတယ္။


  • Smadav2013_crack_techinblogging.blogspot.com.zip ကို Extract ဆြဲပါ။
  • Smadav ကိုခဏပိတ္ထားပါ။ Crack လုပ္ရအဆင္ေျပေအာင္လို႕ပါ။
  • Key.reg ကို ဖြင့္ပါ။ Box ေပၚလာလွ်င္ Yes ကိုကလစ္ပါ။
  • Name.reg ကိုဖြင့္ပါ။ Box ေပၚလာလွ်င္ Yes ကိုကလစ္ပါ။
  • အဆင္ေျပၿပီး စိတ္ခ်ၿပီးျဖစ္ပါတယ္။
အဆင္မေျပဘူးဆုိရင္ ေအာက္ပါ Comment box တြင္ ေပးပါ။ လိုအပ္လွ်င္ ppt1459@gmail.com ကိုအပ္ၿပီးေမးျမန္းႏိုင္ပါတယ္။


I am YGNBlogger and the founder of Tech in Blogging. I am 9th grade student. I'm now 15 years old. I like blogging and writing posts. Through these, my hobbies are swimming and playing games. I am also interested in driving cars.

Adobe Photoshop CS3 ကို Crack လုပ္မယ္ (Part-2)

မဂၤလာပါ Tech in Blogging မွႀကိဳဆိုပါတယ္။ ဒီတစ္ခါလည္း Crack ပါ။ လိုလိုမယ္မယ္ share လိုက္ပါတယ္။ ကြ်န္ေတာ္ အေခြဆိုင္မွာ Photoshop CS3 သီသန္႕၀ယ္မယ္ဆိုေတာ့ package လိုက္ေရာင္းေနလို႕ မ၀ယ္ေတာ့ဘဲ trial ေဒါင္းခဲ့ပါတယ္။ ခု crack ပါထည့္ေပးလိုက္ပါၿပီ။ ဒီ crack က ကြ်န္ေတာ္ ၁နာရီေလာက္အခ်ိန္ေပးၿပီးတင္ခဲ့တာပါ။ ဒါေၾကာင့္ ဖုိင္ဆုိက္နည္းနည္းမ်ားမယ္။ http://techinblogging.blogspot.com/2013/05/adobe-photoshop-cs3-crack-extended.html ည္းကေတာ့ နည္းနည္းခက္မယ္ဗ်ာ။ ထည့္နည္းကေတာ့ ပိုမခက္ပါဘူး။ Serial က အၾကာႀကီးမခံပါဘူး။


Windows (32bit) အတြက္ C:\Program Files\Adobe\Adobe Photoshop CS3
Windows (64bit)အတြက္  C:\ Program Files (x86)\Adobe\Adobe Photoshop CS3

အဲ့ထဲသြားၿပီးရင္ Photoshop.exe ကို Adobe Photoshop CS3 ဖုိဒါတြင္ထည့္ပါ။ Overwrite လို႕ေမးရင္ Yes ကိုေပးပါ။ ၿပီးရင္ ဖြင့္လိုက္ပါ။ အိုေကသြားပါၿပီ။

အဆင္မေျပဘူးဆုိရင္ ေအာက္ပါ Comment box တြင္ ေပးပါ။ လိုအပ္လွ်င္ ppt1459@gmail.com ကိုအပ္ၿပီးေမးျမန္းႏိုင္ပါတယ္။


I am YGNBlogger and the founder of Tech in Blogging. I am 9th grade student. I'm now 15 years old. I like blogging and writing posts. Through these, my hobbies are swimming and playing games. I am also interested in driving cars.

Adobe Photoshop CS3 ကို Crack လုပ္မယ္ (Extended မဟုတ္ပါ)

မဂၤလာပါ Tech in Blogging မွႀကိဳဆိုပါတယ္။ ဒီတစ္ခါလည္း Crack ပါ။ လိုလိုမယ္မယ္ share လိုက္ပါတယ္။ ကြ်န္ေတာ္ အေခြဆိုင္မွာ Photoshop CS3 သီသန္႕၀ယ္မယ္ဆိုေတာ့ package လိုက္ေရာင္းေနလို႕ မ၀ယ္ေတာ့ဘဲ trial ေဒါင္းခဲ့ပါတယ္။ ခု crack ပါထည့္ေပးလိုက္ပါၿပီ။


ကြ်န္ေတာ္ေပးထားတဲ့ crack ကိုယူပါ။ အဲ့ဒါ rar ဖိုင္ပါ။ Extract ဆြဲပါ။ ၿပီးရင္ SERIAL.reg ကိုဖြင့္ပါ။ ၿပီးရင္ Yes ကိုကလစ္ပါ။ ဒါဆိုရင္ Full Version ျဖစ္သြားပါၿပီ။

အဆင္မေျပဘူးဆုိရင္ ေအာက္ပါ Comment box တြင္ ေပးပါ။ လိုအပ္လွ်င္ ppt1459@gmail.com ကိုအပ္ၿပီးေမးျမန္းႏိုင္ပါတယ္။


I am YGNBlogger and the founder of Tech in Blogging. I am 9th grade student. I'm now 15 years old. I like blogging and writing posts. Through these, my hobbies are swimming and playing games. I am also interested in driving cars.

Sunday 19 May 2013

Adobe Dreamweaver CS5 ကို Crack လုပ္မယ္

မဂၤလာပါ။ Tech in Blogging မွႀကိဳဆိုပါတယ္။ ဒီပိုစ့္ေရတဲ့အခ်ိန္ကစၿပီး Crack ၿပီးသားေဆာ့၀္လ္ေတြပဲတင္မွာျဖစ္ပါတယ္။ Trial ကေတာ့ အင္တာနက္ရွာေဒါင္းၾကည့္ေပါ့။ ယခု ကြ်န္ေတာ္က Adobe Dreaweaver CS5 ကို crack နည္းေပးမယ္ဗ်ာ။


Windows (32bit) အတြက္ C:\Program Files\Adobe\Adobe Dreamweaver CS5 
Windows (64bit)အတြက္  C:\ Program Files (x86) \Adobe\Adobe Dreamweaver CS5

အဲ့ထဲသြားၿပီးရင္ အထက္ပါ crack ရဲ႕ zip ဖိုင္ကိုျဖည္ၿပီး အဲ့က dll ကိုထည့္လိုက္ပါ။ ၿပီးရင္ စက္ကို Restart ခ်ပါ။ Full Version ျဖစ္သြားၿပီလို႕ကြ်န္ေတာ္အာမခံပါတယ္။

အဆင္မေျပဘူးဆုိရင္ ေအာက္ပါ Comment box တြင္ ေပးပါ။ လိုအပ္လွ်င္ ppt1459@gmail.com ကိုအပ္ၿပီးေမးျမန္းႏိုင္ပါတယ္။

I am YGNBlogger and the founder of Tech in Blogging. I am 9th grade student. I'm now 15 years old. I like blogging and writing posts. Through these, my hobbies are swimming and playing games. I am also interested in driving cars.

Saturday 18 May 2013

Facebook Profile ႏွင့္ Page ရဲ႕ ID ကိုရွာေဖြရေအာင္

မဂၤလာပါ။ Tech in Blogging မွႀကိဳဆိုလ်က္ပါ။ ကြ်န္ေတာ္ယခု Facebook မွာ ID ရွာခ်င္တဲ့ကိုကိုမမႀကီးေတြအတြက္ အလြယ္ဆံုးနည္းေလးေပးလုိက္မယ္ဗ်ာ။
ဥံဳဖြ။ သိၿပီးတဲ့သူေတြလည္းသိၿပီးေလာက္ပါၿပီ။ ခု spy ဖမ္းမယ္ဗ်ာ။ သင္လိုခ်င္တဲ့ Profile (သို႕မဟုတ္) Page ကို ထည့္ပါ။ ၿပီးလွ်င္ Get Facebook ID ကိုသံုးပါ။ ကြ်န္ေတာ့္ဟာက TechInBlogging ပဲဆိုပါေတာ့ အဲ့မွာထည့္ၿပီး Get Facebook ID ကိုကလစ္လိုက္တာနဲ႕ ID ထြက္လာပါတယ္။ တကယ္အလုပ္လုပ္ပါတယ္။ စမ္းၾကည့္ပါ။ ၿပီးရင္ သင့္စစ္ခဲ့တဲ့ နံပါတ္ကို www.facebook.com/သင့္ရဲ႕နံပါတ္ အျဖစ္ရိုက္ထည့္ၿပီးစမ္းပါ။ ဘယ္လိုျဖစ္မလဲဆုိေတာ့ ေစာင့္ၾကည့္ေပါ့။ :D

Virus ရွိေသာေၾကာင့္ ဖ်က္လိုက္ပါၿပီ။ :D အရင္က စမ္းသပ္ခဲ့တဲ့ သူငယ္ခ်င္းေတြအားလံုးကို ေက်းဇူးတင္ပါတယ္။

Editor's tips ►
အေပ်ာ္သက္သက္ပါ။ ဘာမွမထိခိုက္ပါဘူး။ အာမခံပါတယ္။

I am YGNBlogger and the founder of Tech in Blogging. I am 9th grade student. I'm now 15 years old. I like blogging and writing posts. Through these, my hobbies are swimming and playing games. I am also interested in driving cars.

Friday 17 May 2013

သင့္ Blogger site ကို ျမန္ဆန္ေစမယ့္နည္းလမ္းမ်ား (အပိုင္း-၂) [Blogger only]

မဂၤလာပါ။ Tech in Blogging မွ ဘေလာ့အျမည္းေလးတစ္ခုတင္ေပးပါဦးမယ္ဗ်ာ။ သင့္ Blogger site ကို ျမန္ဆန္ေစမယ့္နည္းလမ္းမ်ား ကို ပထမတုန္းကတင္ၿပီးေလျဖစ္ပါတယ္။ ဒီတစ္ခါေတာ့ အဲ့ဒါကို ျဖည့္စြက္ တင္ဦးမွာပါ။ ဆက္ဖတ္ၾကည့္ပါ။

အနည္းဆံုး ၅ပိုစ့္ပဲ ပင္မမွာထည့္ပါ။ ကြ်န္ေတာ္ကေတာ့ ၇ပိုစ့္ပဲသံုးပါတယ္။ Google + Commenting System ပါလာၿပီဆုိရင္ေတာ့ ကိုယ့္ဘာသာကိုယ္သင့္ေတာ္ေအာင္ ၾကည့္သံုးပါ။ ကြ်န္ေတာ္ခု ထည့္နည္းေလးပါ ေျပာျပလိုက္ပါမယ္။

ထည့္နည္းကေတာ့ Blogger ကိုသြားပါ။ Settings ကိုသြားပါ။ Posts and comments ကိုကလစ္ၿပီး Posts ရဲ႕ေအာက္မွာ Show at most ? မွာ သင့္ေတာ္သလိုတာေရြးေပေတာ့။ အေကာင္းဆံုးကေတာ့ ၆ႏွင့္၇ ပိုစ့္အၾကားပဲေကာင္းပါတယ္။

ခုနက အေပၚက အဆင့္တုိင္ၾကည့္ရွင္းပါ။ ဆုိးက်ိဳးကေတာ့ သင့္ Blog site ရဲ႕ speed ႏွဳန္းက်သြားမယ္ျဖစ္တဲ့အတြက္ ပိုစ့္ေတြကိုေလွ်ာ့လိုက္ပါ။ Google + ရဲ႕ Commenting System ကို http://techinblogging.blogspot.com/2013/05/google-commenting-system.html မွာဖတ္ၾကည့္ပါ။


လူတုိင္းက ျဖတခ်ိဳ႕ Blog site ေတြဆုိရင္ မလိုလည္းထည့္ လုိလည္းထည့္ေတာ့ ေလးေနတာေပါ့ဗ်ာ။ ေဘးမွာ အမ်ားႀကီးထည့္ခဲ့မိရင္ ေတာ္ရုံနဲ႕ အင္တာနက္ကြန္နက္ရွင္မေကာင္းတာနဲ႕ အျပည့္မတက္လာေတာ့မွာမဟုတ္ပါဘူး။ အျပည့္မတက္လာလွ်င္ Warning ေတြခဏခဏ တက္လာမွာျဖစ္ၿပီး လာလည္သူေတြအတြက္ function အျပည့္ၾကည့္လို႕ရမွာမဟုတ္ပါဘူး။ တျခားနည္းလမ္းေတြရွိပါေသးတယ္ ဒီမွာ ဖတ္ၾကည့္ပါ။

ေလွ်ာ့နည္းကေတာ့ ဒီလိုရွိပါတယ္။ ပံုေတြကိုေလွ်ာ့လိုက္ပါ။ Blogger Widgets ႏွင့္ html , ပံုအမ်ိဳးမ်ိဳးစသျဖင့္ ေလွ်ာ့သင့္ပါတယ္။


ဓာတ္ပံုနဲ႕ Script (javascript, html, .etc..)  တို႕တင္မယ္ဆုိရင္ Hosting တစ္ခုတည္းကိုပဲေရြးပါ။ ဓာတ္ပံုေတြ တင္မယ္ဆုိရင္ PhotobucketImageShackHerosh မွာလံုး၀မတင္ပါနဲ႕။ Photobucket ဆုိရင္ ပံုျမင္ၾကာလို႕ပါ။ Herosh မွာေတာ့ ပံုက ပ်က္သြားတာမ်ားပါတယ္။ ImageShack လည္းပံုတင္တာျမန္ဆန္ေပမယ့္ အေကာင့္မလုပ္ထားရင္ ပံုပ်က္သြားတာမ်ားပါတယ္။ Script တင္မယ္ဆုိရင္ေတာ့ Google Codes ကိုလံုး၀မသံုးပါနဲ႕လို႕ေျပာေစခ်င္ပါတယ္။ ဘာလို႕လဲဆုိေတာ့ တခ်ိဳ႕ Google Codes မွာ Authentication ထည့္ဖို႕ေတာင္းပါတယ္။ သင့္ Blog site မွာအဲ့ဒါျဖဳတ္ေစခ်င္ရင္ http://techinblogging.blogspot.com/2013/05/authentication-required-pop-up-box.html ကိုသြားဖတ္ပါ။

တျခား hosting မွာရွာၾကံၿပီးတင္ၾကည့္ပါ။ Javascript တင္ခ်င္တဲ့ မိတ္ေဆြေတြအတြက္ဆုိရင္ေတာ့ Your Javascript မွာသြားတင္ပါ။ မတင္မီ သင့္ရဲ႕ Email လိပ္စာေပးပါ။ တင္ၿပီးက ထိုScript link ကသင့္ရဲ႕ အီးေမးလ္ထဲေရာက္ေနမွာျဖစ္ပါတယ္။ ၿပီးရင္ သင္ Blog site ရဲ႕လိုတဲ့ေနရာမွာခ်ိတ္ရုံပဲ။


Editor's tips ►
သင့္ဆိုဒ္ေလးေပါ့ေပါ့ပါးပါးျဖင့္ လူအလာမ်ားပါေစဗ်ာ။ ဘာမွမဟုတ္တဲ့ script ေတြေၾကာင့္ Blog site မပ်က္သြားပါေစနဲ႕။


I am YGNBlogger and the founder of Tech in Blogging. I am 9th grade student. I'm now 15 years old. I like blogging and writing posts. Through these, my hobbies are swimming and playing games. I am also interested in driving cars.

Tuesday 14 May 2013

ဆိုဒ္အတြက္ Color ကုဒ္ယူရန္ (Blogger only)

မဂၤလာပါ။ Tech in Blogging မွႀကိဳဆိုပါတယ္။ ဆိုဒ္တုိင္းမွာလိုအပ္ေနတဲ့ Tools ေတြေပးလိုက္မယ္။ Code အေရာင္ျပင္တဲ့အခ်ိန္က်ရင္ Hex Colour code က အရမ္းအသံုး၀င္တယ္ဆုိတာကို Blogger ကိုင္သူေတြအားလံုးသိၾကမွာပါ။
ေအာက္ကပံုကိုၾကည့္ပါ။အဲ့ဒါမ်ိဳး လူတုိင္းမွာရွိမယ္လည္းထင္ပါတယ္။ မရွိတဲ့သူေတြအတြက္ ေ၀မွ်လိုက္ပါတယ္။ အရင္ဦးဆံုး LIVE DEMO နဲ႕ၾကည့္ပါ။ ပံုတစ္ပံုရဲ႕ေအာက္မွာ Add to Blogger ပါလိမ့္မယ္။


  • သင္ႏွစ္သက္တဲ့ widget ကိုအရင္ယူပါ။
  • Add to Blogger ကို အရင္ ကလစ္ပါ။ 
  • Add Page Element ဆုိၿပီး page ေပၚလာပါလိမ့္မယ္။ 
  • Add Widget ကို ကလစ္ပါ။ 


http://techinblogging.blogspot.com


Editor ၏အႀကံေပးခ်က္►
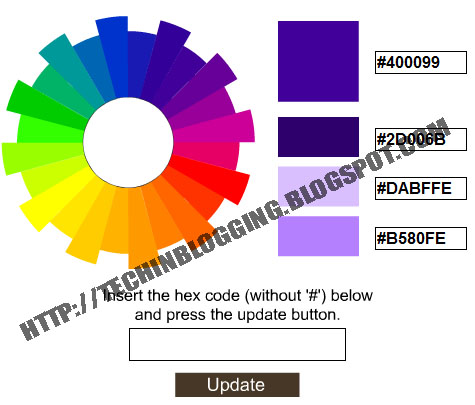
ဒီလိုမ်ိဳးတင္ခ်င္အားျဖင့္ ကိုယ္လည္းလိုလိုမယ္မယ္သံုးလို႕ရတဲ့အျပင္ Blog Template ျပင္တဲ့ မိတ္ေဆြေတြအတြက္လည္း လြယ္ပါတယ္။ Photoshop ကေနသြားရင္ ၾကာဦးမယ္ဗ်ာ။ ဒါနဲ႕ ဒီ Color Code Generator နဲ႕အလွသိပ္မဆင္နဲ႕ဦး http://techinblogging.blogspot.com/2013/04/blogger-site.html မွာသင့္ဆိုဒ္အတြက္ ျမန္ဆန္မယ့္နည္းေလးလည္းဖတ္ၾကည့္ပါဦး။

I am YGNBlogger and the founder of Tech in Blogging. I am 9th grade student. I'm now 15 years old. I like blogging and writing posts. Through these, my hobbies are swimming and playing games. I am also interested in driving cars.

Monday 13 May 2013

Tech in Blogging ရဲ႕ပိုစ့္အားလံုးကို Android ဖုန္းတစ္လံုးရွိရုံႏွင့္ဖတ္ႏိုင္

မဂၤလာပါ။ Tech in Blogging မွအထူးႀကိဳဆိုလ်က္ပါ။ ယခု သတင္းေကာင္းကေတာ့ လူႀကီးမင္းတို႕အားလံုးနီးနီး Android phone တစ္လံုးပိုင္ဆုိင္ေနၾကပါၿပီ။ Tech in Blogging မွ Android version နဲ႕ထြက္ေနပါၿပီ။ တျခားဖုန္းနဲ႕ရေအာင္ႀကိဳးစားၾကည့္မွာပါ။ ကဲ။ ေဒါင္းလုတ္ဆြဲလိုက္ၾကစို႕ဗ်ာ။

Download Now ကိုကလစ္ပါ။ Page တစ္ခုေပၚလာမယ္။ Skip Ad ကိုကလစ္ပါ။ ၿပီးရင္ Download ဆြဲႏိုင္ပါၿပီ။ အဆင္ေျပပါေစ။


(This is our icon for Version 1.0. If you use this icon for illegal, all those faults will not be responsible to us.)


ေနာက္ထပ္ Version အသစ္ေတြလာဦးမည္။ ေမွ်ာ္။

http://adf.ly/OxvEp 

I am YGNBlogger and the founder of Tech in Blogging. I am 9th grade student. I'm now 15 years old. I like blogging and writing posts. Through these, my hobbies are swimming and playing games. I am also interested in driving cars.

Authentication Required ဆုိတဲ့ pop-up box ျဖဳတ္နည္း(Blogger only)


မဂၤလာပါ။ Tech in Blogging မွႀကိဳဆိုပါတယ္။ ခု Blogger Widgets ေတြနဲ႕အလွဆင္တဲ့ေနရာမွာ သူမ်ားရဲ႕ script link နဲ႕အသံုးမ်ားတာေတြ႕ပါတယ္။ အဲ့ဒီလိုအသံုးမ်ားတာက ေရရွည္လံုး၀မေကာင္းပါဘူး။ အထူးသျဖင့္ သူမ်ားရဲ႕ googlecode ပါ။ အဲ့ problem ကိုျမင္ဖူး၊ ႀကံဳဖူးၾကမယ္ထင္ပါတယ္။ ေအာက္က ပံုကိုၾကည့္ပါ။ ဒီလိုမ်ိဳးလာေနရင္ သင့္ blog site ကို၀င္ေနတဲ့ မိတ္ေဆြေတြအတြက္ broswer ဟမ္းေနပါလိမ့္မယ္။ အဲ့ဒါေတြ႕ရင္ ၀င္ရမွာလား။ ဘာလုပ္ရမွာလဲ မသိတဲ့သူေတြအတြက္ အထူး problem ပါ။

  • A username and password are being reqested by ဘာဘာညာညာလာရင္ အဲ့အေနာက္က လင့္ကိုမွတ္ထားပါ။ ပံုထဲမွာေတာ့ https://gj37765.googlecode.com မို႕လို႕ ကြ်န္ေတာ္ကအဲ့ဒါပဲကူးေတာ့မယ္။
  • ၿပီးရင္ Blogger >> Template >> Edit HTML ကိုသြားပါ။ (တကယ္လို႕ Template editor error ျဖစ္ရင္ http://techinblogging.blogspot.com/2013/05/template-error-blogger-only.html ကိုသြားဖတ္ပါ။ အဲ့သင္မွတ္ထားတဲ့လင့္ကို Ctrl + F ကိုကလစ္ၿပီးရွာပါ။ ေတြ႕တာနဲ႕ <script src=' ႏွင္လင့္ေရာ  'type='text/javascript'/> ပါအတူရွာၿပီးဖ်က္လိုက္ပါ။ ၿပီးရင္ Save Template ကိုကလစ္ပါ။
  • ဒါဆိုရင္ အဲ့ အေႏွာင့္အယွက္ကင္းသြားပါၿပီ။ အဆင္ေျပပါေစ။

Editor's desk ►
အဲ့ဒီလိုဖ်က္လိုက္ျခင္းျဖင့္ ေကာင္းက်ိဳးကေတာ့ သင့္ blog ဆိုဒ္လည္းေပါ့ပါးသြားပါတယ္။ လာလည္သူေတြအတြက္ အေႏွာင့္အယွက္ကင္းသြားပါၿပီ။ http://techinblogging.blogspot.com/2013/04/blogger-site.html မွာလည္း သင့္ဆုိဒ္ေပါ့ေအာင္လုပ္နည္းေတြဖတ္လုိ႕ရေနၿပီေနာ္။ ဒီဟာက အမ်ားဆံုး google code က script ကိုသံုးတဲ့သူေတြပဲျဖစ္ေနတာပါ။


I am YGNBlogger and the founder of Tech in Blogging. I am 9th grade student. I'm now 15 years old. I like blogging and writing posts. Through these, my hobbies are swimming and playing games. I am also interested in driving cars.

သင့္Blog ဖြင့္တိုင္း Adult content စာမ်က္ႏွာႀကီးမလာေလေအာင္ (Blogger only)


မဂၤလာပါ။ Tech in Blogging မွႀကိဳဆိုပါတယ္။ ၀င္လို႕မရတဲ့ Blogger ဆုိဒ္ေတြကို ေက်ာ္မယ္ခြမယ္ ကို ကြ်န္ေတာ္တို႕ တင္ေပးခဲ့ၿပီးေလျဖစ္ပါတယ္။ ကြ်န္ေတာ္အရင္က လက္ကလိေတာ့ အဲ့လိုျဖစ္သြားပါတယ္။ ခုေတာ့ အဆင္ေျပပါၿပီ။ အဲ့မွာ I UNDERSTAND AND I WISH TO CONTINUE နဲ႕ I do not wish to continue ဆုိတာကိုျပပါတယ္။ ေအာက္ကပံုဆုိရင္ေတာ့ျမင္ဖူးပါလိမ့္မယ္။ ကြ်န္ေတာ္တုိ႕ ကြန္နက္ရွင္မေကာင္းတဲ့ေနရာမွာဆိုရင္ ဒီလိုခဏခဏေပၚေနရင္ေတာ့ ၀င္ရသူအားလံုးခက္ခဲပါတယ္။


http://www.blogger.com/ ကိုသြားပါ။ မ၀င္ရေသးရင္ Sign in လုပ္လိုက္ပါ။
သင္ Porn ဆိုဒ္လုပ္ေနတဲ့ ဘေလာ့မွာ Settings >> Other ကိုသြားၿပီး  Adult Content ကိုေတြ႕ေအာင္ရွာပါ။ Adult Content? ရဲ႕ညာဘက္မွာ Yes အစား No ေပးလိုက္ပါ။ ဒါဆုိရင္အဆင္ေျပပါၿပီ။
Editor's desk ►
အဲ့ဒါက လက္ကလိမိတဲ့သူေတြအတြက္ပါ။ လာလည္တဲ့သူေတြအတြက္ အေႏွာင့္အယွက္ပ်က္သြားေပမယ့္ သင့္ porn blog site ဟာ Blogger မွ Remove လုပ္သြားပါလိမ့္မယ္။ ကိုယ့္ဘာသာ ကိုယ္ခ်ိန္ၿပီး လုပ္ပါ။ ဆင္ျခင္ေတြးေတာတတ္ပါေစ။


I am YGNBlogger and the founder of Tech in Blogging. I am 9th grade student. I'm now 15 years old. I like blogging and writing posts. Through these, my hobbies are swimming and playing games. I am also interested in driving cars.

Sunday 12 May 2013

Mobile တြင္ Post တစ္ခုတင္နည္း (Blogger only)


မဂၤလာပါ။ Tech in Blogging မွႀကိဳဆိုပါတယ္။ နည္းလမ္းေတြအမ်ားႀကီးရွိပါတယ္။ ခု Android ဖုန္းေတြေခတ္စားလာၿပီ။ iOS လည္းေခတ္စားလာပါၿပီ။ နည္းေတြအကုန္ေျပာျပထားမယ္ဗ်ာ။ နည္းအေဟာင္းေတြလည္းတင္ထားပါဦးမယ္။ Mobile နဲ႕ အင္တာနက္ရွိတာနဲ႕ Blogger ေလးနဲ႕ပိုစ့္ေတြ
 ပဲျဖစ္ျဖစ္ သတင္းပဲျဖစ္ျဖစ္ တင္လို႕ရေနပါၿပီ။


MMS မက္ေဆ့ပဲျဖစ္ျဖစ္ go@blogger.com ကို REGISTER လို႕ေရးၿပီးပို႕လိုက္ပါ။ Capital စာလံုးအႀကီးျဖင့္သာ ရိုက္ရပါမယ္ဗ်ာ။
Blogger က သင့္ကို Claim code နဲ႕ mobile blogger address ပါပို႕လိမ့္မယ္။
http://www.blogger.com/mobile-start.g ကို၀င္ၿပီး သင့္ကို Blogger မွပို႕လုိက္ေသာ Claim code ကို Claim token ေပၚတြင္ျဖည့္ပါ။ အဆင္ေျပပါၿပီ။
မခ်ိတ္ေစခ်င္ရင္ MMS ေပၚမွာ UNREGISTER လို႕ရိုက္ထည့္ၿပီးပို႕လိုက္ပါ။ Capital စာလံုးအႀကီးျဖင့္သာ ရိုက္ရပါမယ္ဗ်ာ။ ဒါဆုိရင္ျပဳတ္သြားပါၿပီ၊ ရာသက္ပန္ျဖစ္သြားပါၿပီ။ ၀င္ခ်င္ရင္ ပထမနည္းအတိုင္းလုပ္ပါ။ :D


256447 မွာ REGISTER ဟုပို႕လုိက္ပါ။ Capital စာလံုးအႀကီးျဖင့္သာ ရိုက္ရပါမယ္ဗ်ာ။
Blogger က သင့္ကို Claim code နဲ႕ mobile blogger address ပါပို႕လိမ့္မယ္။
http://www.blogger.com/mobile-start.g ကို၀င္ၿပီး သင့္ကို Blogger မွပို႕လုိက္ေသာ Claim code ကို Claim token ေပၚတြင္ျဖည့္ပါ။ အဆင္ေျပပါၿပီ။
Blogger ဆီမွ SMS မ၀င္ေစခ်င္ရင္ STOP ဟုေရးၿပီးပို႕လိုက္ပါ။ Capital စာလံုးအႀကီးျဖင့္သာ ရိုက္ရပါမယ္ဗ်ာ။ ဒါဆိုရင္သူ႕ဆီက အရွုပ္အထုတ္ေတြမ၀င္ေတာ့ပါဘူး။
မခ်ိတ္ေစခ်င္ရင္ SMS ေပၚမွာ UNREGISTER လို႕ရိုက္ထည့္ၿပီးပို႕လိုက္ပါ။ Capital စာလံုးအႀကီးျဖင့္သာ ရိုက္ရပါမယ္ဗ်ာ။ ဒါဆုိရင္ျပဳတ္သြားပါၿပီ၊ ရာသက္ပန္ျဖစ္သြားပါၿပီ။ ၀င္ခ်င္ရင္ ပထမနည္းအတိုင္းလုပ္ပါ။ :D


http://itunes.apple.com/us/app/blogger/id459407288 မွာကလစ္ပါ။ မျဖစ္ႏိုင္တာမရွိပါဘူး။ iOS မွာေတာင္ရွိၿပီဆုိေတာ့ သင္ try ၾကည့္ပါ။ ေအာက္က QR Code ပါ။ သင့္ရဲ႕ ဖုန္းနဲ႕ scan လုပ္ၿပီး Download ဆဲြဲပါ။ ပိုစ့္လည္းေရးလို႕ရပါၿပီ။ ပံုေတြလည္းထည့္လို႕ရပါတယ္။


https://play.google.com/store/apps/details?id=com.google.android.apps.blogger ကိုသြားၿပီး Android ဖုန္းေပၚတြင္ ေဒါင္းလုတ္ဆြဲႏိုင္ပါတယ္။ Google Play ကေနေဒါင္းလို႕ရပါတယ္။
(Using with Google Play & Scan here)

1Mobile Market ကေနယူမယ္ဆိုရင္ http://www.1mobile.com/blogger-94741.html မွာယူပါ။ 1Mobile Market ကလူအသံုးမ်ားပါတယ္။

(Using with 1Mobile Market & Scan here)


http://store.ovi.com/content/266320 တြင္ယူလို႕ရပါတယ္။ Blogger ေရာ WordPress အပါအ၀င္ပါ။ ကြ်န္ေတာ္ကေတာ့ Nokia ဖုန္းမရွိလို႕မစမ္းသပ္ရေသးပါဘူး။

Editor's desk ►
MMS နဲ႕ SMS တို႕ကနည္းလမ္းေဟာင္းျဖစ္ပါတယ္။ သိပ္လည္းအလုပ္မလုပ္ပါဘူး။ iOS ႏွင့္ Android မွာသံုးလွ်င္ ပိုမိုေကာင္းပါတယ္။ Nokia နဲ႕ မလုပ္ပါနဲ႕။ ေႏွးတယ္လို႕ေျပာသံၾကားလို႕ပါ။


I am YGNBlogger and the founder of Tech in Blogging. I am 9th grade student. I'm now 15 years old. I like blogging and writing posts. Through these, my hobbies are swimming and playing games. I am also interested in driving cars.